Update 10 Sep 2014: This article is only applicable for WP8.0. WP8.1 removed this setting!
While reading an IOS7 review, I come across a power-saving tip, which I didn’t thought of as a power-saving tip at first.
We have the same setting in Windows Phone. If you go to WiFi settings -> Advanced, you have “Notify me when new networks are found.” By default, it’s ON.
WP8 WiFi Advanced Setting
This feature was available since WP7 but it never crossed my mind that it actually controls the WiFi Roaming Aggressiveness of WP OS. I just found it annoying so I have switched it OFF immediately after getting a new WP phone. So I never had a chance to see the effects when it was on.
According to the IOS7 review, switching this off saves power!
For me, my WiFi is always ON, “Keep WiFi on when screen times out” is ON & “Notify me when new networks are found” is always OFF. And because of this, my Windows Phones’ battery life have always been good! I couldn’t understand why there’re still reports of poor battery life even after switching to 3G on their 4G phones + switching off all Background Agents.
Then I remembered last year I posted a comment on whether switching ON the WiFi ALL the time is a good idea or not & I concluded that as long as the WiFi radio is not roaming & it can enter low-power state when associated with a wireless access point, it CAN save power. However, unlike in Windows where you can select WiFi Roaming Aggressiveness, you can’t do so in WP7/8. Or so I thought until the IOS7 article.
I connected the dots & BAM! This Notify setting is the Roaming aggressiveness setting!
Switch it OFFguys & gals!
Sound off in the comments below on how your battery life is affected.
* Update 10 March 2016 – New info from Eudes Martins & free eBook from Vaclav Krejci. Thanks!
Where are my Presets?
Office 2013/2016 generally improved the usability & productivity of Word, PowerPoint, etc. However, for some reason, WordArt wasn’t fully ported over in Word 2013/2016.
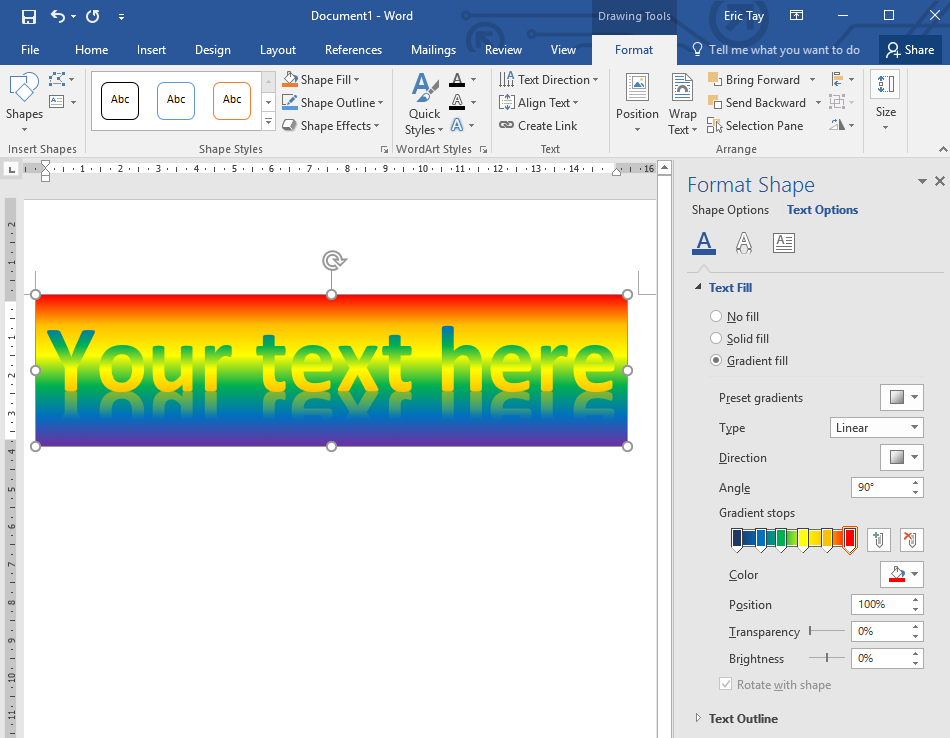
For example, when I wanted to create Rainbow text in Word 2007, I just “Insert -> WordArt” & select the Rainbox preset, but in Word 2013/2016, this is what we’ll all get.
Blah! All the effects are missing!
After some searching on MS Office forum, I found someone who suggested saving your document in Word 97-2003 format, then Insert WordArt & you’d get the usual WordArt that we’re all familiar with, like so…
Updated solution!
Thanks to Eudes Martins (his comments below), I now know that you can just go to File -> Convert and the WordArt effects will carry forward to the new DOCX format correctly after following the previous steps.
However, the port is not 100% compatible because when you click inside the Textbox, the rendered text looks different, like so.
Strangely, the rendered text shrank and it became a double-rainbow! 😀 Oh well at least it works! You can also see that the new Office 2013/2016 way of doing rainbow text is to use Text Fill -> Gradient Fill -> Add Gradient Stop 4 times, then choose Color for each Gradient Stop. Don’t you agree it is just a big hassle?
So here’s hoping the Microsoft Office Team adds more Quick Styles instead of the 15 bland and boring styles that we see now. Maybe they can sort out the imported WordArt from Word 97-2003 as well? 😉
Now I like how everything in Word 2013/2016 is a Live Preview, no more entering Text in dialog box business. But, they should quickly port over all these older Preset because, Yes, there’re still people using them a decade after they’re introduced. I have the number of hits this page gets to proof it! 🙂
Just a bit of fun to show how powerful the new Format Shape Gradient Fill feature is, check this out! I use “Gradient Fill” for both Shape Options AND Text Options. Yeah yeah, you wouldn’t see me using this in a professional report but I’m sure there’re many people who would find this useful!
Incidentally, have you checked out the AWESOME Free eBook on how to create the “7 Best Text Effects in Word” by Vaclav Krejci? It’s the first comment in this post!
All comments and questions are welcome. Click now if you don’t see the comments.
Be sure to this article if you find it useful and share it with your friends and family, or colleagues who can benefit from it! Button are all over my website just waiting for you to click them! 🙂
Click the button at the bottom right to receive more technology related article written by me! Or follow me @EricTayET on Twitter to see what I’m reading and writing.
I am replying to a forum post when it struck me that one of the reasons why people have so much problem with navigating Windows 8 with touch gestures is the fact that there are simply no instructions or hints for you to swipe from the edges.
I’ve watch a few unboxing videos & those Windows tablets came in clear cling film which protects the screen & other surfaces, and sometimes indicate what the various hardware buttons do.
There is supposedly an animated tutorial when you first setup your Windows 8 tablet but I believe you can skip it. The problem is, after skipping it, it’s almost impossible to find that tutorial again.
So why can’t vendors (including Microsoft) just print additional instructions on the cling film or affix clear stickers at the bezel to indicate how edge swipes work in Windows 8/RT tablets, or even laptops with touchscreen.
It’ll go a long way in assuring new users of Windows 8/RT has the basic knowledge on the most important swipes needed to successfully navigate the Start Screen without a lot of fumbling & frustrations.
By now, the world has once again heard about Singapore & mistaken us as some China state. Hint to these people, Google ASEAN or South-East Asia. Some people are still hazy about who we are (pun intended.)
But I digress. There are many ways for people to beat the haze but the best is to stay indoors with the air-con on and all doors & windows closed as tightly as possible. If you have put off installing an air-con in the house, please consider doing so now, as the haze will be with us for many more weeks. Look at my post here on how to choose an air-con suitable to your house in Singapore.
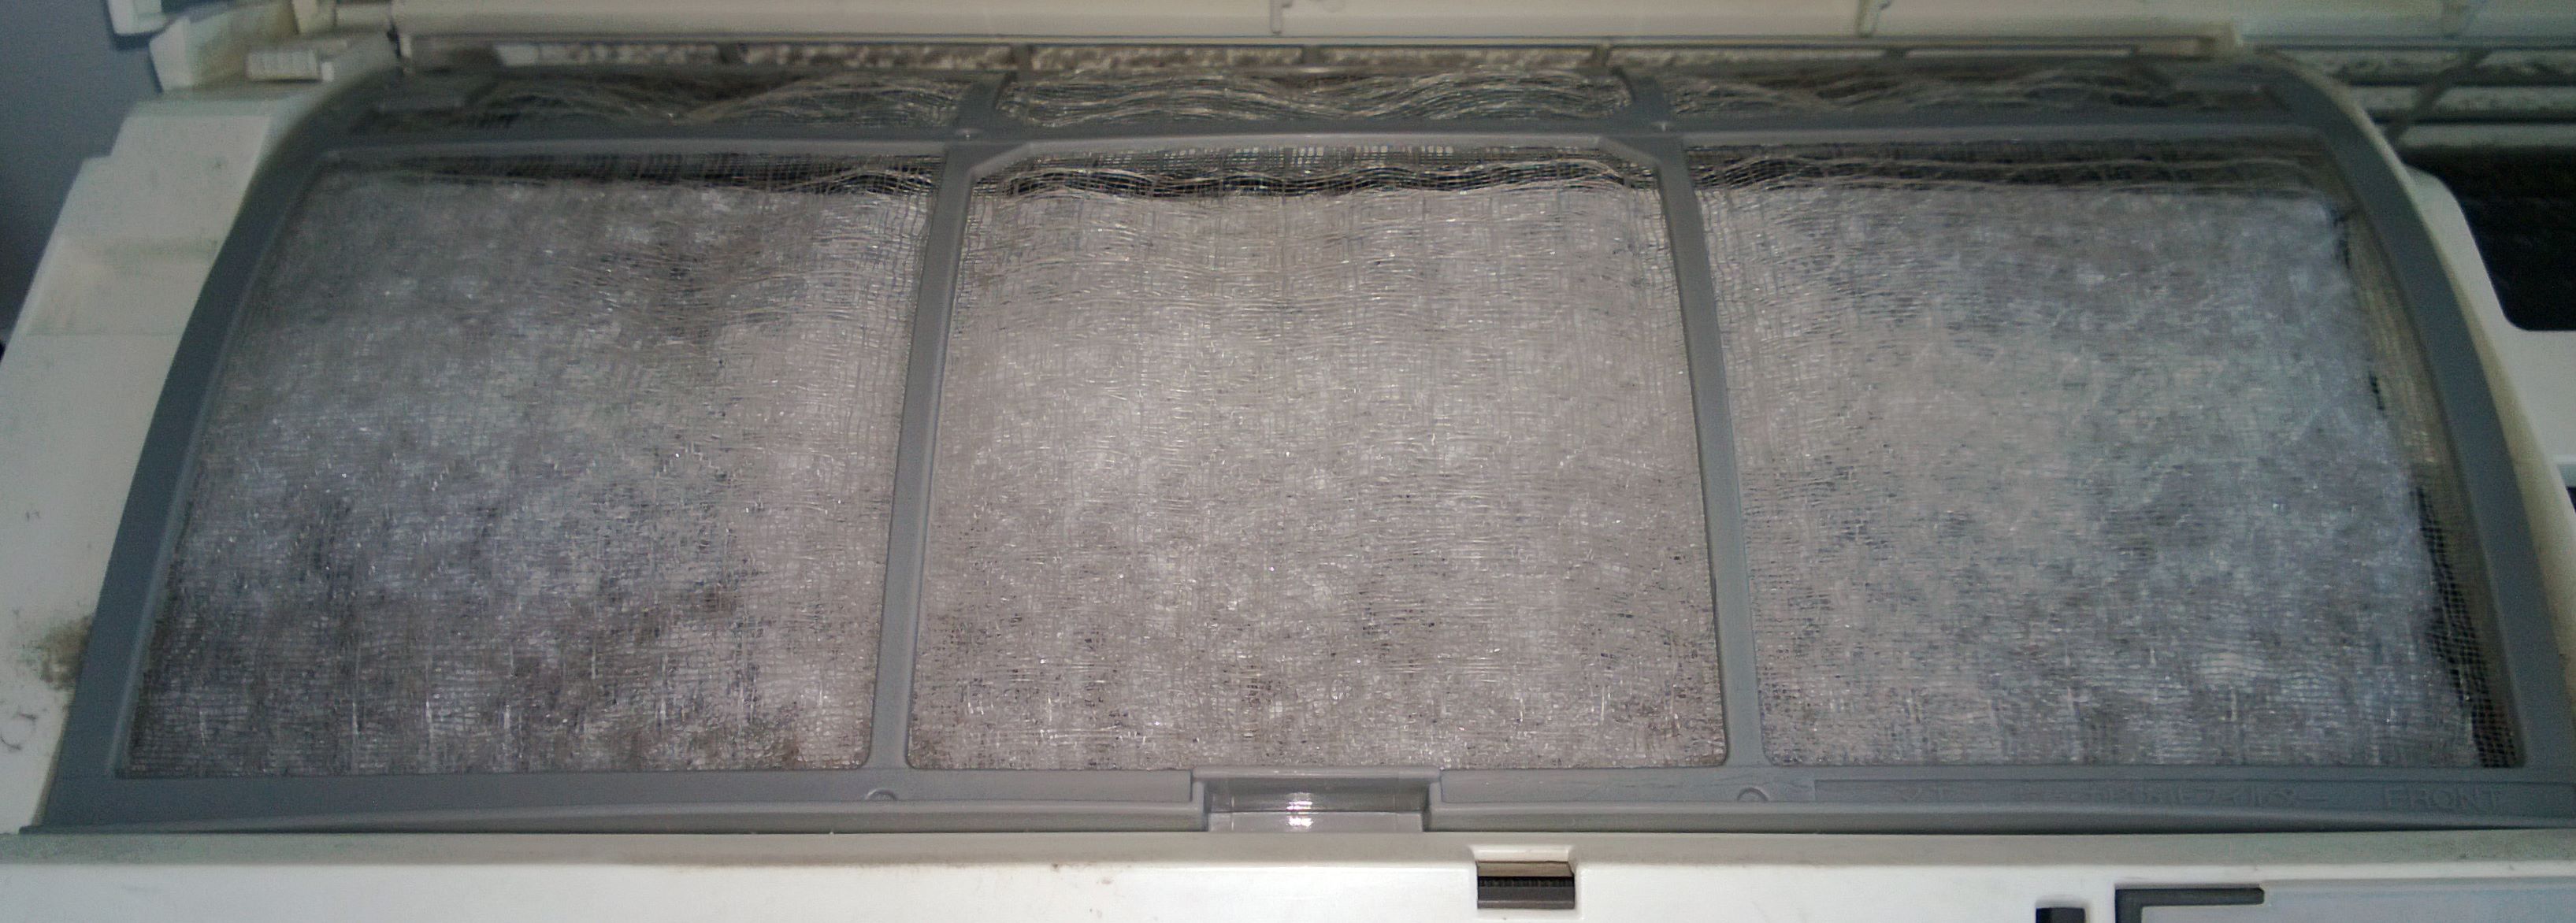
Offices are usually the best as the air-cons are maintained by professionals regularly. The air-cons at home, may not be maintained as regularly so do clean them today if you haven’t done so in the last 3 months. I just cleaned mine today & there’re a lot of grey ash on it.
Many people are also turning to air purifiers to help clean the air in their home or office and while many of the good ones are effective, they also tend to be noisy ( >60dB on high setting), not to mention they cost many thousands of dollars.
Let’s take a look at some that I’ve come across.
Air Purifier
Air purifiers work by pushing & pulling air through multiple membrane filters. Due to the resistive nature of membrane, the fan motor must be very powerful in order to move enough air to be effective. Hence, you have 2 types of noise, mechanical noise from the motor & wind noise. The situation is worst in air purifiers with HEPA filters because those are so restrictive to air flow, hence some makers like Rainbow & Delphin use water as the main filter + a “L-Lamella” separator cone to reject fine dust.
I bought this German made Delphin Vacuum system 10 years ago & it’s still working. However, I rarely use it for air purifying because the wind noise is annoying.
Rainbow still include a HEPA filter but this results in the motor having to work very hard & it’s really loud when vacuuming. When purifying air, it’s not as annoying but still noisy. The air flow also doesn’t seem as high as the Delphin.
Rainbow Vacuum with HEPA filter.
The advantage of water-based system are they’re less restrictive to air flow and thus saves energy + can recycle the air faster. Even if they can’t filter the same amount of dust in 1 cycle, the amount of air they can process in the same amount of time makes up for their lower efficiency. This is especially true for the Delphin system which doesn’t have any membrane filter at all!
Water is also able to dissolve much of the harmful chemicals & odour in the air that membrane filters are not able to remove. This is why many air-purifiers also include a charcoal (or activated carbon) filter which adds to the cost of purchase and maintenance.
OK fine, I just want to know the cheapest & fastest way to purify my air!
Why I’m glad you asked. If you’ve skip the above explanation, that’s fine. I recommend using the air-con as your MAIN air purifier for 2 simple reasons. It’s the most efficient and fastest mover of air in the house, and it’s also very quiet (typically 25dB on Auto).
BUT, obviously the filters in your air-con are not actually very good. Some air-cons have UV and Plasma technology. UV kills virus & bacteria so it only sterilize the air, not filter dust.
Cold Plasma technology is basically air-ionization, which introduce an electrical charge to dust particles so they can stick to another charged surface. However, this introduce a small amount of ozone which is unhealthy with prolonged inhalation. The charged dust particle must still stick to another opposite charged surface before it’s removed from the air so its efficiency is not consistent in every environment.
SO, the best solution is to introduce another filter behind your air-con filter.
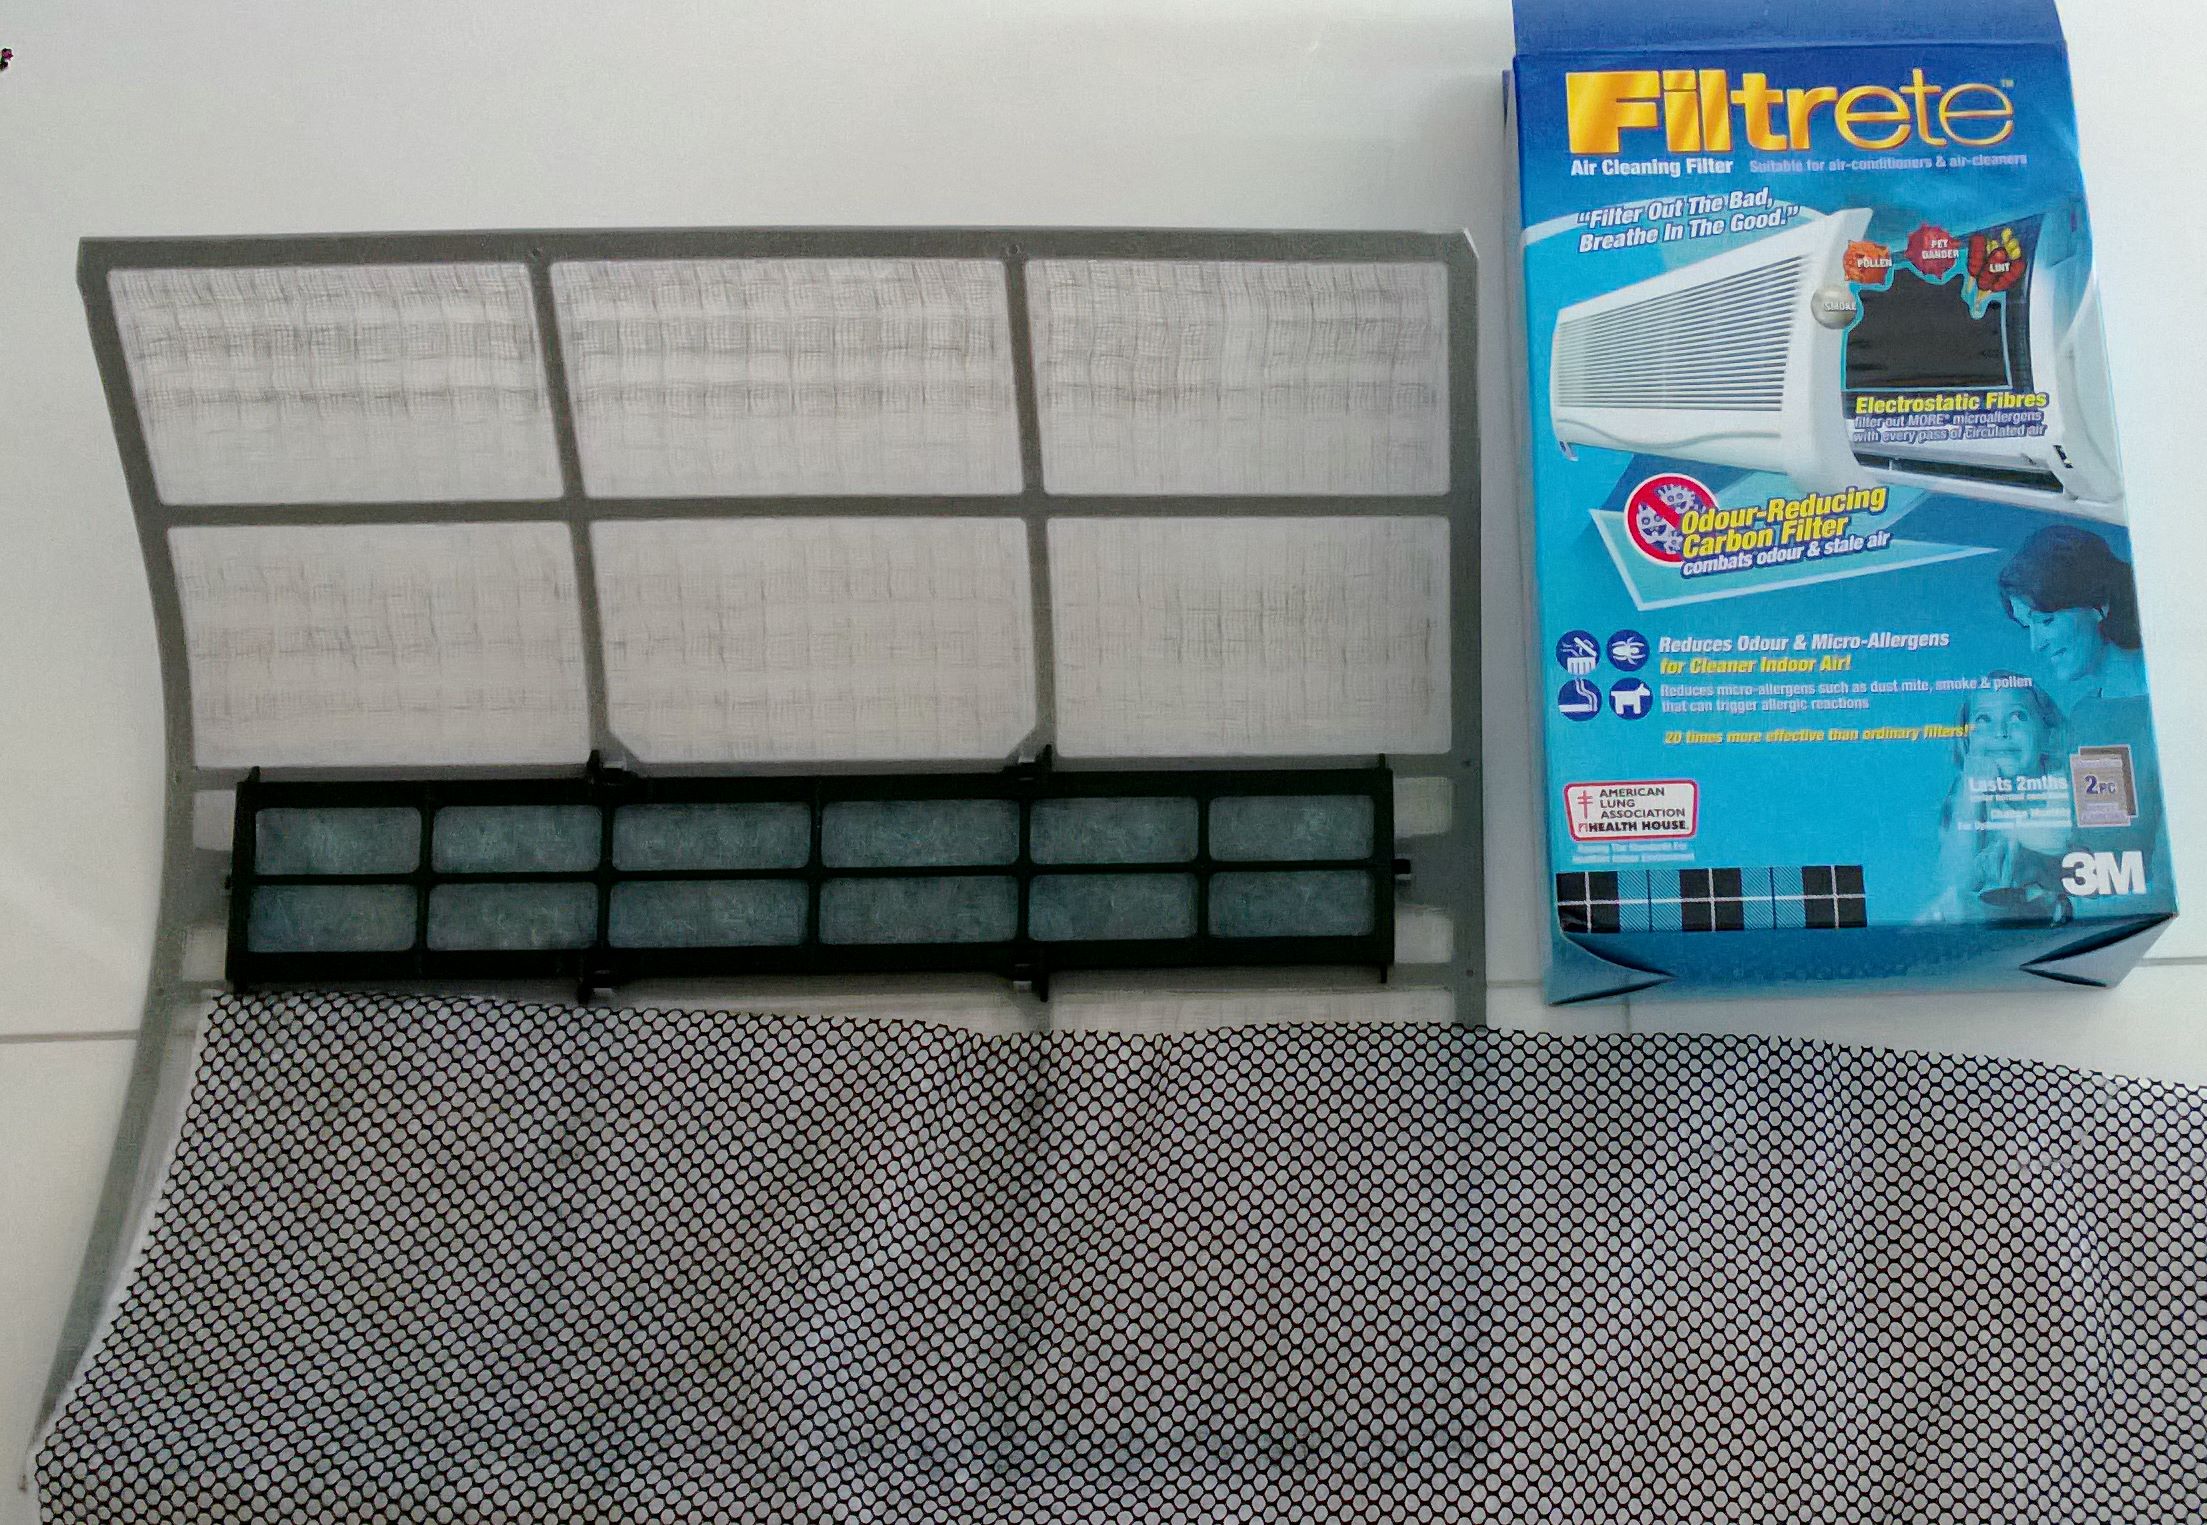
I bought the blue box Filtrete at a DIY shop for less than $30.
It’s an electrically-charged membrane filter with carbon so it’s able to filter particle down to 0.3 micron + the carbon will help to absorb harmful chemicals & odour. It’s not as efficient as a HEPA filter but because the air-con is pushing so much more air through the filter per minute, the result is still very good with noticeably cleaner & neutral smelling air in 10 minutes.
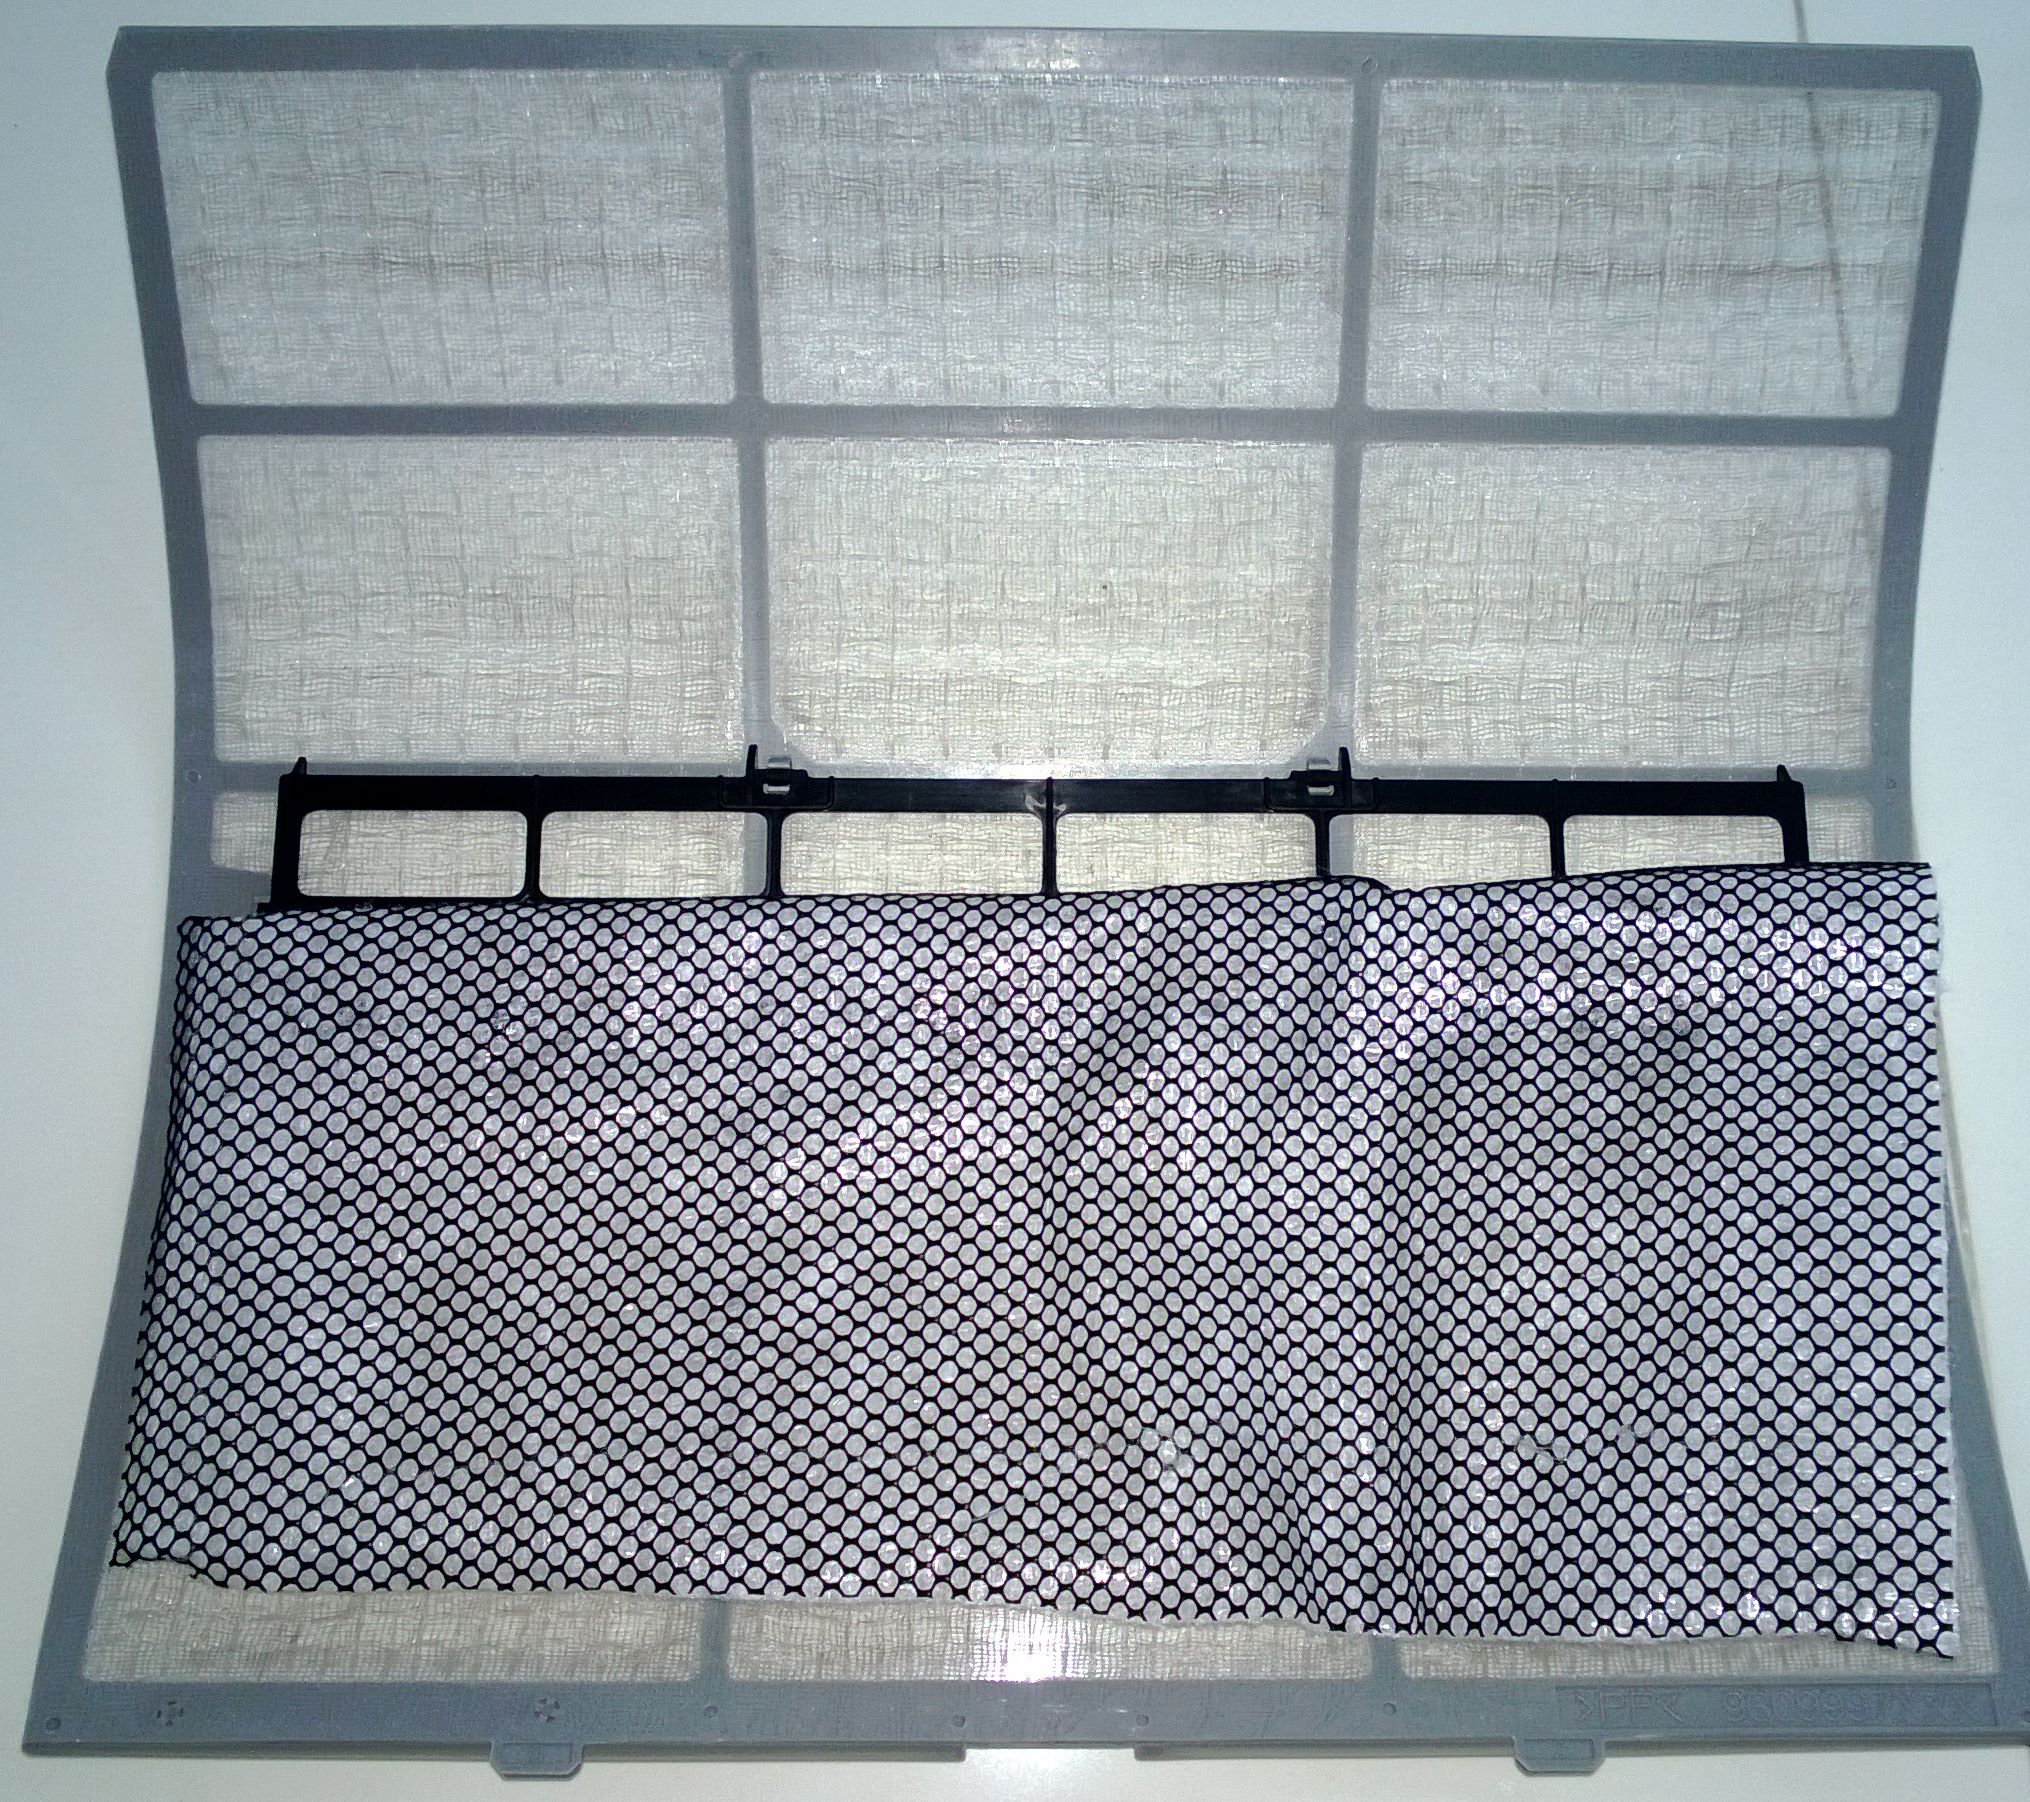
The black mesh is the carbon & the membrane filter is behind it. Just cut it to size & stick it or place it behind the normal air-con filter, then reinstall your air-con filter.
It’s recommended to cover up to 70% of the air-con filter to allow good air-flow so the air-con cooling power is not compromised. Don’t worry, after 1 month, the membrane will turn a icky grey to let you know the filter IS working. The filter is rated to work for 2 months but with this haze, I recommend changing it sooner, when the filter turns completely grey.
I install the 3M Filtrete behind the normal air-con filter to prolong its life-span.
Each box contains 2 pieces of 60 x 30cm filter, which is enough to last an air-con blower unit 18 months if you change it every 2 months.
For less than $30 per air-con unit per year, I’d say that’s VERY cheap!
Lastly, for you people who are lazy, you can install the 3M filter OVER the air-con filter so you don’t even need to wash the filter in future. Obviously, the 3M filter will get dirty faster but since the haze wouldn’t last forever, it’s completely fine. 😉
OK, maybe not ALL about it since I’m only talking about the cooling part. In this post, I’m just going to talk about how to choose an air-conditioner and how to maximize its usage while minimizing energy consumption.
There are a few things that affect how cold aircon feel so take note of these points when buying your next air-con.
1. Blower speed – The higher the better to circulate the air & draw out the heat & humidity. Setting your blower speed to AUTO is the best. When you first switch on the aircon, the blower will be high but as the temperature approach the set temperature, the blower will slow down. If you use a fan to circulate the air, it’ll work even better! But after the walls & furniture cool down, the fan should be switched off because fan/blower noise is irritating & distracting especially when watching a movie.
* Remember, the aircon will cool the walls/floor/ceiling first due to larger surface area.
2. Temperature (inside the room, outside the compressor) – Inside the room, depends on what you’re cooling. If you always have party with many people + you have a big amplifier, set lower (see heat capacity). The thermostat will try to increase cooling power (for inverter) and turn the blower on ‘high’ longer. I set mine to 27’C when watching a movie on my home theatre & it’s cool enough if the blower is directed at the sofa.
Outside the compressor, if the weather is really hot, the compressor need to turn on the fan higher to exchange heat more efficiently and this increases power consumption. My compressor is facing the evening sun so I got 2 compressors that can handle 100% of the BTU load.
3. Humidity – this is the reason we feel stuffy, high humidity reduces our skin ability to cool down from evaporation and makes our lungs work harder to extract oxygen from the air. A good aircon can extract an insane amount of water from the air. My aircon can probably fill a bucket in an hour.
4. Direction of flow – self-explanatory. Want to feel COLD NOW? Stand in front of the aircon blower. Ladies should stand aside to avoid the cold air and dry skin.
5. Blower heat capacity (also compressor wattage for multi-split) – calculate the amount of heat (in BTU) that you expect the blower to extract. This depends on room volume. Budget in extra 10% in Singapore for hi-res HDB/Condo, or 20% if there’re many windows. Budget in 30% if you always have parties. People generate a huge amount of heat.
For compressor, it depends on how many blowers you have. With 3 blowers or more, always go for inverter. I used to have a non-invertor System3 for my old 3-room HDB, it seriously uses tons of energy but it was cheap. Now I have 1 System3 + 1 System2 to cool 5 rooms. Both are invertor systems and even though my room size has doubled, my current air-con actually uses LESS power on average! Based on this calculation, I should breakeven in 5 years.
Correct calculation of heat capacity will ensure you feel cool & save power since the compressor don’t have to struggle to exchange heat. For compressor, ensure you have at least 80% of the wattage required for extracting the Total BTU the blowers can sustain. This is because for invertor system, most of the time, it wouldn’t be operating at max capacity (if you do your math right).
For non-invertor multi-split, when any blower is on & temperature is above thermostat setting, the compressor is also ON FULL. On a hot day, the compressor is always on, maxing out on exchanging heat even though my 1 blower isn’t able to extract that much BTU. So to save some energy, buy up to 80%. Your room wouldn’t cool as fast when ALL blowers are on but it wouldn’t cost so much money to operate.
6. Room size/shape – depending on room size & shape, placement of the blower should be as near to where the people will be as possible. If you have odd shape room like an L-shape or has different segments, consider a blower in each segment. My living room is conjoin to my dining room so I have a 12000BTU blower for the living room & a 9000BTU for the dining room.
7. Room insulation & how many windows – make sure your doors have as little gap as possible to reduce air movement. Large windows are nice but also allow more sun in and trap the IR inside the room. If you don’t have IR film on your windows, increase your BTU budget, especially if you have evening sun. Curtains & blinds will help by reflecting some of the IR back outside the house and create an air buffer.
8. Coolant & Drainage piping – This is usually neglected but making sure the refrigerant flows smoothly to/from the compressor to the blowers without leaking and without choking at the bends is very important.
Just as important is making sure the drainage pipes for the water extracted from the air is piped out without leaking & causing a mess especially if everything is buried in walls & ceilings.
Make sure you have a reputable contractor to install these pipes! Some brands insist on using their contractor, like Fujitsu Singapore. Go for it! Make sure your interior designer or renovation contractor can work well with the aircon contractor. This will ensure a good installation, an efficient aircon & no trouble in the future.
I hope this has helped you in choosing the correct aircon. If you have any comments or suggestions on what to add in this article, please comment below.
Recently, after owning the Lumia 920 for about 3 months, I noticed that I can’t turn the screen on while taking call. During that time I’ve updated to Portico & dust started accumulating in the front facing camera (FFC). So I googled the problem & came up with this thread at Nokia Forum.
The solution for me is to use the front camera a few times with different light source, just like how you need to calibrate the front camera to get the correct screen brightness adjustment, you need to calibrate it for calling as well. I’ve tried to get rid of the dust in the FFC lens by vacuuming, didn’t work. Will try a lens blower next if not, I’d just have to open up my Lumia 920.
Apparently either the proximity OR the FFC will switch off the screen. Why not just use the proximity sensor only? My Lumia 800 had no issues when I place the phone to my face when calling. Unless Nokia telling me the screen wouldn’t switch off in the desert…
Anyway the situation seems to be better now that I “calibrated” the FFC.
1308 Update
I got the 1308 update almost 2 weeks ago which completely solved the problem for most people. As far as I can tell, when the dust covers about 30-40% of the lens, the “calibration” technique will fail because not enough light falls onto the sensor. The 1308 seems to switch on the FFC longer to get a more accurate “averaged” reading thus solving the dust blockage issue.
Of course, the ultimate solution is to send the phone in for cleaning & replacement of the FFC casket.
Microsoft launched Windows 8 to much fanfare on 25th to 26th Oct 2012 worldwide & the reception has been pretty good overall. Steve Ballmer mentioned at the Windows Phone 8 launch that Windows 8 takeup rate was faster than Windows 7 was back in 2009. There are, however, still concerns that it will leave behind a big group of enterprise users who have a problem with the learning curve involve with the Start Screen.
Yes, the Start Menu & Start button are gone & there’s no way to get it back without buying some third-party software, which business will, no doubt, hesitate in spending extra on.
If you’re wondering what made Microsoft make such a major change, read my opinion piece here.
How to be productive in Windows 8 on older PC
Many PCs are still running great or are acceptable. Most of them don’t have a Touchscreen or Pen digitizer. The biggest concern for many users is, can the new interface be used with Keyboard & Mouse without sacrificing productivity? The answer is a resounding YES!
Now, let me qualify that I’m going to teach you how to use WIndows 8 using an average keyboard & mouse, not the new generation of keyboard with Windows 8 keys or the new mice that has Touch surfaces or even Trackpads that mimic a Touchscreen. Just you plain old familiar stuff. You’re welcome to upgrade your keyboard & mouse if you want some of the new features but they’re not necessary. Microsoft has taken care of us.
The new Start Screen
Your new playground to drive away the Monday Blues & welcome TGIF!
Well as mentioned, Start button & Start menu are gone. In its place is this beautiful, cheerful full screen & scrollable page with tiles arrange in neat grids. The first reaction is the information overload if you’ve configured your Windows 8 to sync with your MSN/Xbox/Hotmail/WP7 account. Next is the shock of not being able to find your favourite software & perhaps Desktop!
Start Typing on the Start Screen & you get Auto Search!
No worries, let go of the mouse & start typing the name of your software right at the Start Screen. A panel will appear on the right & the result will be shown on the left. You can select your program by using the Up/Down arrow keys & pressing Enter.
By default, Windows 8 will search your keyword under Apps, Settings & Files. This means that you can easily find anything on your App list, Windows settings & even files on your HDD without leaving the Start Screen! You will also notice that beneath the 3 system defaults, there are some apps that you’ve installed. By clicking them, you’re actually asking the App to search your keyword within the App automatically! How convenient is that!
The All Apps screen…
So what if you just want a list of All your apps & programs? No problem! Just right click at the a blank area of the Start Screen & a panel will pop-up from below. You can also press the Context Menu key to bring it up. To the right, you’d see an “All Apps” icon. Click it & all the apps are displayed alphabetically & in groups where applicable.
The Windows Key on your keyboard becomes extremely important in Windows 8. Pressing it always switches you to the Start Screen or between the Start Screen & the Desktop depending on what app is in the foreground.
The Start Screen & All apps list is also the place where you uninstall stuff. No need to open Control Panel!
Charms Bar
More useful for tablets but serves a purpose with keyboard as well
Now you may have heard of the Charms bar which appears from the right. Just move your mouse to any of the right corners to bring it up or press Win+C. This is where you find more shortcuts like the before-mention Search.
The Charms Bar is also where you’d find the Share button. Share allows you to share stuff from one app to another, similar to copy & paste; Windows Icon acts like the Windows key; Devices shows some currently connected peripherals; Settings is where you can change the Settings of the current Metro app or Start Screen.
The Charms Settings Bar is also where you can change Networking, Volume, Brightness, Notifications from Apps, Power & Keyboard language.
Multitasking
Next major change is regarding multi-tasking between different Apps & Software.
Move your mouse to the top-left corner to bring up the last used Software/App. Slide down to bring out the multitasking screen or press Win + Tab to bring it up on the Left & cycle through opened software & Apps.
Another great & useful way to multi-task
Right-click on the App & you can close it. You can also move the mouse to the top of the App, then drag down to close.
Alt-Esc still works in Desktop by cycling through non-minimized software windows.
Alt-Tab still show Live Preview of your software & Apps in an overlay on top of Desktop or Start Screen.
The invisible Start Button
Preview instead of Start Button
The Start Button may be gone but by hovering your mouse over the bottom-left corner of the screen, a mini Start Screen will appear. Clicking it brings you to the Start Screen, giving the same functionality as the Windows key. Sliding up also brings out the multitasking screen.
Finally! All the Power User functions grouped into a menu!
Now the best part is for power user, right-clicking here brings up a context menu with all the administrative tools like Computer Management, Mobility Center & Control Panel, etc. The old Mobility Center shortcut, Win + X now bring up this menu.
Snap!
Shamelessly ripped from Microsoft demo video because my old laptop doesn’t have at least 1366 horizontal pixels
For Windows 8 with a minimum of 1366 horizontal pixel, you can use a new Snap function to “snap” a second app to the edge of the screen to allow multitasking. Just move the mouse to the left corners of the screen, slide down, drag one of the apps out & hover for a while. It should expand & snap to the edge that you hover over.
Ending notes
If you’ve any questions on other problems not listed above or you’d like me to show more features, please leave your comments & I’d try to answer them.
Of all the workshops I conduct, my favorite is negotiation. Today I’ll tell you why, and give you some useful tips to save time and money in your personal life.
We’ll start with this simple premise. When you study negotiation, there are generally three areas of focus, and I use the acronym TIP to help people remember them: time, information and power. Let’s look at all three.
Any time you’re in a negotiation and you have all the time in the world, you’re in the better position. Example: you have to sell your house to relocate, having already bought a house in the new location. Home buyers have all the time in the world to look for a house, but you’re in a hurry as you’re soon to be squeezed for cash. You’re in the weaker position.
Years ago, American auto-makers and other companies would travel to Japan to negotiate…


 now if you don’t see the comments.
  this article if you find it useful and
  share it with your friends and family, or colleagues who can benefit from it! Button are all over my website just waiting for you to click them!
  button at the bottom right to receive more technology related article written by me! Or follow me